Operator's Guide and How to Manual
Click to skip intro and scroll to actual how-to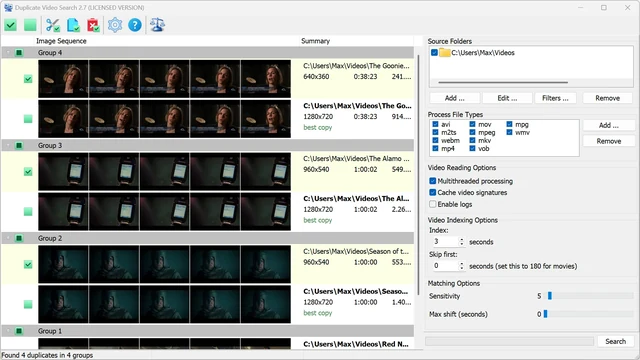
Whether for work or play, we use computers for just about everything these days. Over time, our hard drives become full of files; files that eat up space and ultimately cause our machines to run slower. Video files are some of the most significant contributors to lost space, and a lot of that has to do with how easy it is to generate duplicate videos accidentally.
No one sets out to intentionally make two copies of the same video; it just happens. Duplicates can appear due to an assortment of reasons. For instance, when you make a copy of a video and save it to a new folder; or when you download two copies of the same video file but in different formats. All it takes is forgetting to go back and delete the extra or unwanted copies, and there they sit.
The larger and older your video collection is, the higher the chance that there are dozens, if not hundreds, of duplicate or similar videos slowing your system down.
How does DVS work?
With Duplicate Video Search in your toolbox, you'll never have to worry about unwanted video files hogging your hard drive space again! Using DVS is both easy and fun through our automated process of locating duplicate video files. All you need to do is tell DVS where to look, sit back, and relax while it does all the work for you. No more having to compare individual files manually!
Unlike other duplicate search utilities, our unique visual recognition program actually "watches" your videos. Instead of surface scans limited to filename or size, the Duplicate Video Search tool compares files in an attempt to find subtle similarities. Our innovative sliding sensitivity scale lets you decide exactly what level of similarity that DVS should be looking for.
Regardless of format or resolution, DVS can find and analyze your videos based on finer factors like conversion, cropping, scaling, and high/low quality to measure similarity levels. Once the potential copies are found, you'll have the option to keep, delete, or move them to another folder. However, you choose to handle them, the fact is you'll be gaining a greater awareness of the video content of your drive(s).
Getting started
This quick how-to guide will give you a better idea of how to get started using the Duplicate Video Search tool for the first time. It describes version 2.8, which adds a smart choice of the best copy in every group of duplicates.
Step 1: Download Duplicate Video Search
Duplicate Video Search has been confirmed by many independent parties such as Download.com, Softpedia and TopShareware and more to be 100% FREE of adware, malware, and spyware.
Step 2: Launch the program
The results of your previous search are saved when you close the program and restored the next time you start it, so you can continue where you left off without scanning again.
Step 3: Add one or more target directories
- Select which folders to have DVS scan by adding them to the list in the Source Folders box. Subfolders are always scanned too.
- Click the Add ... button to add a folder to the list, Edit ... to change the selected one and Remove to delete the selected folders from the list (you can select several at once).
- Each folder has a checkbox: clear it to skip the folder in the next search without removing it from the list.
- Click Filters ... to exclude files from the search by name, path, size or date. A filter can use * and ? wildcards (e.g. *sample*) or a regular expression. The Preview ... button shows the files in your folders that the enabled filters will skip.
- In the Process File Types box, tick the video formats that should be scanned. Use its Add ... button if you need a format that is not on the list.
Step 4: Setting *optional features
The following features are optional. However, each of them will help you to refine further how the Duplicate Video Search tool goes about scanning for similarities.
Video Reading Options
- Keep Cache video signatures enabled: DVS stores the fingerprint of every processed video, so repeated searches only have to process new files.
- Disable Multithreaded processing for troubleshooting only or in case DVS slows your system too much during the scanning.
- Enable logs is useful only if you need to send us a problem report.
Video Indexing Options
- Index: specify how many seconds of each video you'd like indexed. The longer this interval is, the more accurately duplicate videos will be detected (less false positives). Warning: the higher your indexing number, the longer the scan will take. We recommend finding a happy medium or leaving this at the default setting of 3.
- The Skip first __ seconds option helps you to avoid the first several minutes of movies, where previews and trailers often tend to vary in length and content. We recommend that you set this to 180 seconds to skip the first 3 minutes when scanning movie collections.
Matching Options
- The Sensitivity slider sets how much videos may differ and still be considered duplicates: the higher the value, the bigger the differences it accepts. If your first scan shows a lot of false positives, lower the value; if it finds few or no duplicates, raise it, then scan again. The second scan is always much faster, and it gives you a second set of comparisons!
- The Max shift can help you negotiate time differences between videos. For example, two videos might be the same but have their time signatures off by a few seconds; a scene that occurs in one at 4:03 might not happen in the other until 4:07. We recommended you set this value to 5. Set it to 0 to find exact duplicates only.
Settings
- The Settings toolbar button opens a dialog where you can change the interface language, move the signature cache to another folder or clear it, choose whether deleted files go to the Recycle Bin, and open the Best copy criteria.
Step 5: Start retrieval
- The Search button lets you start the inspection process. DVS will scan your selected folders for video copies. Clips that are discovered to have high levels of video similarity will then be grouped for your inspection.
- Using our special video fingerprinting process, DVS can see past surface details like file formats and instead, analyzes the visual content of each video file.
- Each time you run the Duplicate Video Search scans become faster. This is due to the way that files are indexed. DVS processes only a limited number of seconds for each video, and then stores a signature for each in a cache (if Cache video signatures option is enabled). This makes it so that the next time you want to run a scan, the program can save time by re-using cached signatures and processing only new clips. Please note, the signatures have to be recalculated if you change one of "video indexing" options.
Step 6: Remove duplicate video files
- After the scan has completed, DVS will gather the results as a list of thumbnails. For each video, the program displays duration, date of last modification, path, and resolution. The checkbox indicates the file status; whether it's a duplicate or an original.
- DVS picks the best copy in every group automatically: its name is shown in bold with a "best copy" note, and all the other files of the group get tick marks, so they are ready to be removed right away.
- Review the groups: double-click a file to play it, or right-click it to open its folder. If you disagree with the choice, simply move the tick marks, or change the criteria once and let DVS re-mark everything.
- If you want to mark dupes yourself, remove the automatic marks first with the
 toolbar button, then put your own ticks.
 - Then click the toolbar button to delete, cut or copy the marked files. Before anything happens, a confirmation window lists all affected files and the disk space involved; you can remove files from the list there. If Windows cannot delete some files (for example, they are open in another program), DVS deletes the rest and tells you which files were left.
Smart choice of the best copy
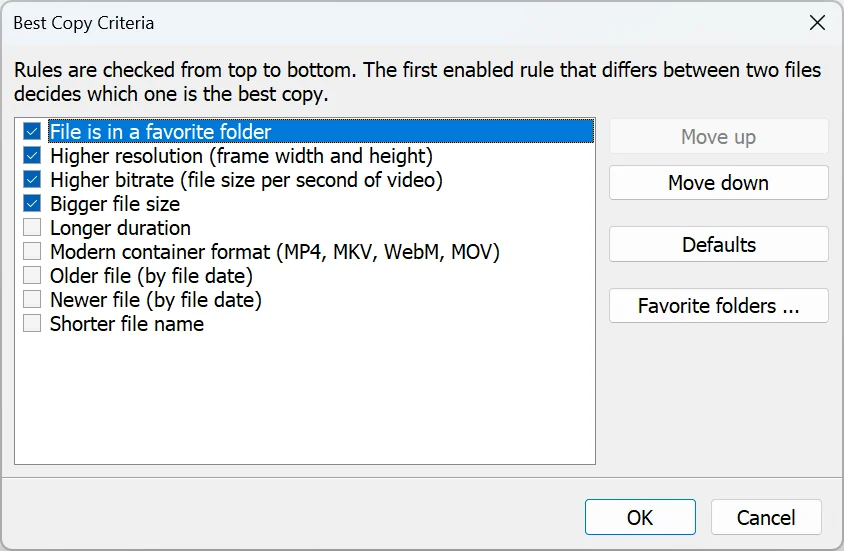
Which file of a duplicate group deserves to be kept? Starting with version 2.8, DVS doesn't just keep the widest video — it compares the files by a list of rules, and you decide which rules matter and in what order. By default the program prefers a file from your favorite folders, then the higher resolution, then the higher bitrate, then the bigger file.
Open the Best copy criteria dialog (the button in Settings, or right-click an empty spot of the results list) to tune the logic. The rules are checked from top to bottom, and the first enabled rule that differs between two files decides which one is the best copy. Reorder the rules with the Move up / Move down buttons, switch them on and off with the checkboxes, and press Defaults to return to the original setup:
- File is in a favorite folder — a file stored in one of your favorite folders (or its subfolder) wins over a copy stored elsewhere. Click the Favorite folders ... button to list the folders where your main, well-organized collection lives. The rule sits on top by default but has no effect until the list contains at least one folder.
- Higher resolution — the file with the larger frame width and height wins.
- Higher bitrate — more data per second of video usually means better quality.
- Bigger file size
- Longer duration — e.g. prefer the uncut version over a truncated one.
- Modern container format — prefer MP4, MKV, WebM, MOV over legacy formats.
- Older / Newer file — by the file modification date.
- Shorter file name — copies often get suffixes like "(1)" or "- Copy", so the original tends to have the shortest name.
New criteria are applied to the current results as soon as you press OK: the "best copy" notes move to the new winners. The tick marks you already have are left untouched — press the  toolbar button to re-mark everything except the new best copies.
Glossary
The toolbar buttons operate with the files marked with the tick marks! They are considered duplicates. You can put or remove a tick by clicking the checkbox or pressing the Space key.
Click to mark all files except the best copy of each group.
Click to remove all tick marks.
Click  to cut duplicates to the clipboard.
Click  to copy duplicates to the clipboard.
Click  to move copies to the trash can
To work with a single file regardless of the tick marks, right-click it in the results list. The popup menu lets you play the video, open its folder, and also cut, copy or delete the file, or paste files from the clipboard into a directory of your choice. The clicked file is selected automatically; you can extend the selection with "Shift" + "Up" / "Down" keys and apply the menu commands to several files at once.
Right-clicking a group header offers group-wide marking commands (mark all, unmark all, mark all except the best copy), and right-clicking an empty spot of the list opens the global ones: remove all tick marks, mark everything except the best copies, or open the best copy criteria dialog.
Double-click to open the item in the default viewer (assigned for this file type in Windows Explorer settings)
What's next?
Congratulations, now that you've finished scanning and removing duplicate videos from your hard drive, you've taken the first of many important steps toward freeing up space and helping your machine run smoother. To organize your computer even further, explore more of our great comparison utilities by visiting us at Bolide® Software. You'll discover that we have solutions for audio, video, images and more!